- 浏览: 695854 次
- 性别:

- 来自: 北京
-

文章分类
- 全部博客 (272)
- Struts1.x (7)
- 事务 (2)
- Hibernate (11)
- 数据库 (14)
- JavaScript&Ajax (43)
- JSP&Servlet (2)
- Flex (1)
- 其它 (9)
- Java (22)
- 框架集成 (1)
- WebService (3)
- Tomcat (3)
- 加密和安全登录 (13)
- 基于原型的JavaScript (0)
- JavaDoc和Java编码规范 (3)
- CAS (1)
- 加密 (1)
- Axis2 (10)
- Ext2.x (3)
- SSH整合 (2)
- Ext (0)
- 正则表达式 (1)
- 设计模式 (4)
- 对象序列化技术 (3)
- CVS (2)
- Struts2 (6)
- Spring 2.x (7)
- Spring Security (2)
- Java 课程 (20)
- 程序员之死 (1)
- 软件测试 (6)
- UML (5)
- NetBeans (1)
- cxf (1)
- JMS (13)
- 设计 (5)
- ibatis2.x (3)
- Oracle (1)
- WebSphere (7)
- 概要设计 (1)
- DB2 (10)
- PowerDesigner (0)
- 软件工程 (5)
- rose (1)
- EA (1)
- LDAP (7)
- Portal&Portlet (3)
- MQ (10)
- ESB (4)
- EJB (2)
- JBoss (2)
最新评论
-
typeRos:
只有配置文件,没有代码么大神
Spring实现IBMMQ的JMS消息发布/订阅模式 -
panamera:
如果ActiveMQ服务器没有启动,这个时候消息生产者使用Jm ...
Spring JMSTemplate 与 JMS 原生API比较 -
lian819:
顶1楼, 引用文件, 配置属性, 太方便了
EXTJS 同步和异步请求 -
wilhard:
说得清楚明白
<%@ include file=""%>与<jsp:include page=""/>区别 -
刘琛颖:
总结的很好。受益了
javascript 父窗口(父页面)— 子窗口 (子页面)互相调用的方法
Design and implement POJO Web services using Spring and Apache CXF, Part 1: Intr
- 博客分类:
- cxf
Summary: Create a plain old Java™ object (POJO)-style Web service easily using Apache CXF, an open source Web service framework. This article, Part 1 of a series, shows you how to expose POJOs as Web services using Spring and CXF. It also illustrates CXF integration with the Spring Framework. View more content in this series Tags for this article: cxf, part1, spring, web_services Date: 24 Jul 2008 Design and implement POJO Web services using Spring and Apache CXF, Part 1: Introduction to Web services creation using CXF and Spring
Level: Intermediate
PDF: A4 and Letter (58KB)Get Adobe® Reader®
Also available in: Chinese Japanese
Activity: 43552 views
Comments: 8 (View | Add comment - Sign in)

In this article, you build and develop an order-processing Web service using CXF and Spring. This Web service processes or validates the order placed by a customer and returns the unique order ID. After reading this article, you can apply the concepts and features of CXF to build and develop a Web service. To run the examples in this article, make sure the following software is installed and set up on your machine: After the above distribution is installed, set up the following environment variables: By way of example, set CXF_HOME=C:\apache-cxf-2.1 and add the following to the PATH env variable: Apache CXF is an open source framework that provides a robust infrastructure for conveniently building and developing Web services. It lets you create high-performance and extensible services, which you can deploy in the Tomcat and Spring-based lightweight containers as well as on a more advanced server infrastructure, such as JBoss, IBM® WebSphere®, or BEA WebLogic. The framework provides the following features: Let's look specifically at how to create an order-processing Web service and then register it as a Spring bean using a JAX-WS front end. You use the code-first approach, which means you first develop a Java class and annotate it as a Web service. To do this, you typically perform the following steps: First let's create the order-processing Web service SEI. Create the order-processing Web service SEI Create an SEI named As you can see in Listing 1, the Write the implementation of the SEI To write the implementation of the SEI in the previous section, you again annotate your implementation class, You've created an SEI and its implementation. Using CXF, now you can make this an actual service component using a JAX-WS front end. Create a configuration file for CXF A CXF configuration file is actually a Spring configuration file that contains bean definitions. You create a bean definition for the Finally you need to: You've just finished developing the necessary server-side components. Now you can develop a client component that makes a request to the As you can see from Listing 5, it's very easy to create the client bean, just as it was easy to create the service endpoint. You create a Java main program that uses the Spring context to get the client bean defined, then invoke the Before running the program, create the directory structure shown in Figure 1 under your root C:\ folder and put the components covered previously in this article into it: For building, deploying, and running the The application folder (c:\orderapp) has the Ant build files. After running the above command, your The orderapp folder is created under the webapps folder of Tomcat. After the server is started, run the application by entering the This article briefly described the features of the CXF framework and demonstrated how it lets you create a Web service without much coding effort. You learned about Spring integration with CXF using a bean context file. You also looked at how the framework abstracts the actual semantics of creating a Web service infrastructure component and provides you with a shell of a simpler API that simply focuses on Web service creation. Now that you've seen the basics of Web service creation using CXF, check out Part 2 of this series, which shows you how to expose POJOs as RESTful services using CXF and Spring.
OrderProcess, which will have a method, processOrder, that takes an order bean and returns a string. The goal of the processOrder method is to process the order placed by the customer and return the unique order ID.
Listing 1. OrderProcess SEI
package demo.order;

import javax.jws.WebService;

@WebService
public interface OrderProcess {
  String processOrder(Order order);
}
OrderProcess SEI is simply a standard Java interface that's annotated as a Web service. The @WebService annotation simply makes the interface a Web service interface. This interface is used by the client or the consumer to invoke the service method. The OrderProcess SEI has one service method, processOrder, which takes Order as a parameter and returns the order ID as a string.
Listing 2. OrderProcess service implementation
package demo.order;

import javax.jws.WebService;

@WebService(endpointInterface = "demo.order.OrderProcess")
public class OrderProcessImpl implements OrderProcess {

 public String processOrder(Order order) {
  return order.validate();
 }
}
OrderProcessImpl, as a Web service and provide an attribute, endpointInterface, with a value as a fully qualified name of the SEI you created in the previous step. This tells the class to implement the OrderProcess SEI. Because it's an implementation of an SEI, you have to provide implementation of the processOrder method that returns the order ID.
Listing 3. beans.xml configuration file
<beans xmlns="http://www.springframework.org/schema/beans"
 xmlns:xsi="http://www.w3.org/2001/XMLSchema-instance"
 xmlns:jaxws="http://cxf.apache.org/jaxws"
 xsi:schemaLocation="
http://www.springframework.org/schema/beans
http://www.springframework.org/schema/beans/spring-beans.xsd
http://cxf.apache.org/jaxws http://cxf.apache.org/schemas/jaxws.xsd">

 <import resource="classpath:META-INF/cxf/cxf.xml" />
 <import resource="classpath:META-INF/cxf/cxf-extension-soap.xml" />
 <import resource="classpath:META-INF/cxf/cxf-servlet.xml" />

 <jaxws:endpoint
  id="orderProcess"
  implementor="demo.order.OrderProcessImpl"
  address="/OrderProcess" />

</beans>
OrderProcess Web service using JAX-WS front-end configuration. The <jaxws:endpoint> tag in the beans.xml file specifies the OrderProcess Web service as a JAX-WS endpoint. It effectively means that CXF internally uses JAX-WS to publish this Web service. You have to provide the implementation class name, which is OrderProcessImpl, and the address to the <jaxws:endpoint> tag. The address that you provide is relative to the Web context.
Listing 4. web.xml Web configuration file
<web-app>
 <context-param>
  <param-name>contextConfigLocation</param-name>
  <param-value>WEB-INF/beans.xml</param-value>
 </context-param>

 <listener>
  <listener-class>
   org.springframework.web.context.ContextLoaderListener
  </listener-class>
 </listener>

 <servlet>
  <servlet-name>CXFServlet</servlet-name>
  <display-name>CXF Servlet</display-name>
  <servlet-class>
   org.apache.cxf.transport.servlet.CXFServlet
  </servlet-class>
  <load-on-startup>1</load-on-startup>
 </servlet>

 <servlet-mapping>
  <servlet-name>CXFServlet</servlet-name>
  <url-pattern>/*</url-pattern>
 </servlet-mapping>
</web-app>
OrderProcess service.
JaxWsProxyFactory is used to create the client bean for the OrderProcess Web service. The factory bean expects the service class (OrderProcess) and the URL of your service. The client bean stub, OrderProcess, is then created by using the factory bean reference.
Listing 5. client-bean.xml client Web configuration file
<beans xmlns="http://www.springframework.org/schema/beans"
 xmlns:xsi="http://www.w3.org/2001/XMLSchema-instance"
 xmlns:jaxws="http://cxf.apache.org/jaxws"
 xsi:schemaLocation="
http://www.springframework.org/schema/beans
http://www.springframework.org/schema/beans/spring-beans-2.0.xsd
http://cxf.apache.org/jaxws
http://cxf.apache.org/schema/jaxws.xsd">

 <bean id="client" class="demo.order.OrderProcess"
  factory-bean="clientFactory" factory-method="create"/>

 <bean id="clientFactory" class="org.apache.cxf.jaxws.JaxWsProxyFactoryBean">
  <property name="serviceClass" value="demo.order.OrderProcess"/>
  <property name="address" value="http://localhost:8080/orderapp/OrderProcess"/>
 </bean>

</beans>
processOrder method.
Listing 6. The client code
public final class Client {

 public Client() {
 }

 public static void main(String args[]) throws Exception {
  ClassPathXmlApplicationContext context
   = new ClassPathXmlApplicationContext(new String[]
     {"demo/order/client/client-beans.xml"});

  OrderProcess client = (OrderProcess)context.getBean("client");
    Order order = new Order();

  String orderID = client.processOrder(order);
  System.out.println("Order ID: " + orderID);
  System.exit(0);
 }
}
Figure 1. Code directory structure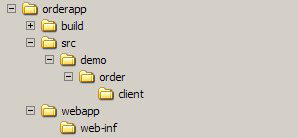
OrderProcess Web service and client, you use the Ant tool. The code is deployed on the Tomcat server. Deploy the code using the ant deploy command under the c:\orderapp folder.orderapp code is deployed in the Tomcat server environment as the orderapp.war file. Now start the Tomcat Web server by providing the catalina start command under the CATALINA_HOME\bin folder.ant client command. The output displays the order ID (see Figure 2).
Figure 2. Program output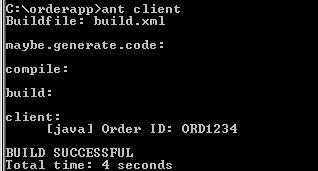


发表评论

相关推荐
Marrying the two technologies is therefore a very natural choice.This book takes you through the design of RESTful web services and leverages the Spring Framework to implement these services....
BI Design and implementation, BI Design and implementation, BI Design and implementation, BI Design and implementation,
一本操作系统领域的经典经典教程,英文版的,享受吧
Spring addresses and offers simple solutions for most aspects of your Java/Java EE application development, and guides you to use industry best practices to design and implement your applications. ...
SOA design and implement
The final part of this book describes how to approach real-world projects and takes the reader through the design, planning, and building of several projects, including: User authentication and ...
Build a powerful, stable, and automated test suite using Selenium WebDriver About This Book Keep up with the changing pace of your web application by creating an agile test suite Save time and ...
Chapter 1: Introducing The Spring Framework Chapter 2: Inversion Of Control In Spring Chapter 3: Dao And Jdbc In Spring Chapter 4: Hibernate With Spring Chapter 5: Spring Web Mvc Framework Chapter 6: ...
Operating Systems Design and Implementat 3rd ( 英文pdf 和 word),网上普遍是chm版的,我自己把它弄成pdf和word版。本来想把chm版也打包了,不过超过了15mb,所以就只提供pdf和word版的。
Understand what responsive design is, and why it’s vital for modern web development HTML5 markup is cleaner, faster, and more semantically rich than anything that has come before – learn how to use ...
While the REST design philosophy has captured the imagination of web and enterprise developers alike, using this approach to develop real web services is no picnic. This cookbook includes more than ...
Design and Implement Servlets JSPs and EJBs for IBM WebSphere Application Server
Docker on Amazon Web Services is for you if you want to build, deploy, and operate applications using the power of containers, Docker, and Amazon Web Services. Basic understanding of containers and ...
Chapter 1:Introduction Chapter Objectives The Characteristics of Databases A Note on Naming Conventions A Database Has Data and Relationships Databases Create Information Database Examples Single-User...
Design_and_Implement_Any_Filter_in_Less_than_60_Seconds
real time operating system it is a very good document
Building Modern Web Applications Using Angular by Shravan Kumar Kasagoni English | 29 May 2017 | ASIN: B01FI3CCU4 | 226 Pages | AZW3 | 2.55 MB Key Features Learn about the core building blocks of ...
A top-level security guru for both eBay and PayPal and a best-selling information systems security author show how to design and develop secure Web commerce systems. Whether it's online banking or ...